Above: The Craig Special + Push Press is MTI’s favorite Total Body Strength exercise.
By Rob Shaul
Here’s the Quick List. Explanations follow:
→ Total Body Strength
→ Lower Body Press
→ Lower Body Pull
→ Upper Body Press
→ Upper Body Pull
Total Body Strength
I define a “total body” strength exercise as one which includes a significant level change and/or has an Olympic lifting power element.
Do you suck at Oly lifting? No matter … I’ve found the exercises below to be great strength builders no matter the athlete’s Oly lifting proficiency. Technical ability allows athletes to lift more weight, but everyone increases strength doing these exercises. Athletes with poor technical ability just don’t need to load on as much weight to increase their individual strength.
How? Take my long-time lab rat, Cody, as an example. Cody has been training with me for 4+ years, and simply cannot figure out how to do the clean movement, no matter how much I coach him. Yet, his nickname in the gym is “Cock Strong.”
Younger, smaller, more athletic lab rats will rep power cleans at 225# with perfect form and crisp movement.
Cody’s “power clean” is really a deadlift + a reverse curl. He reps 185#. You try reverse curling 185# …..
Here are my top 3 Total Body Strength Exercises:
(1) Craig Special + Push Press
Hang Squat Clean + Front Squat + Pause at the top then + Push Press
The Craig Special + Push Press combines many of the great elements I like to see in a total body exercise:
- Trains the ability of the athlete to take “impact” via the “catch” of the hang squat clean
- Includes two simple, non-complicated strength elements with the front squats and the push press
- Includes a significant level change – with the push press to the load overhead
- There is a significant Mountain/Tactical Chassis demand – think midsection strength.
After a good warm up, complete 9 rounds of 2 reps of this exercise – working up rapidly until 2x is “hard but doable.” Aim to be at that load by round 4 or 5 and get in a good stretch between rounds.
(2) Power Clean + Push Press
About 12 years ago I spent a week shadowing Dan John when he was still a High School strength and conditioning coach in Salt Lake. Dan had a simple formula for getting strong. “Take something heavy off the ground and put it overhead.” This is the definition of the Power Clean + Push Press.
Note that I don’t choose the Push Jerk. Why? The push press is harder, plus I personally have never been able to do a “jerk.”
(3) Mutant Maker
Hang Squat Clean into a Thruster. Another, great, total body exercise which will get athletes strong no matter their technical lifting form and ability. this is just simple, hard, work.
Lower Body Press
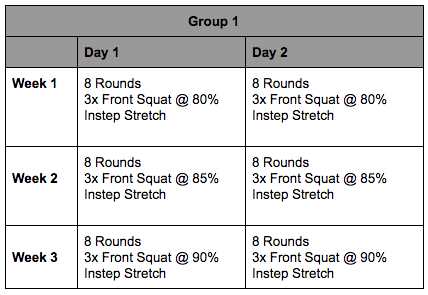
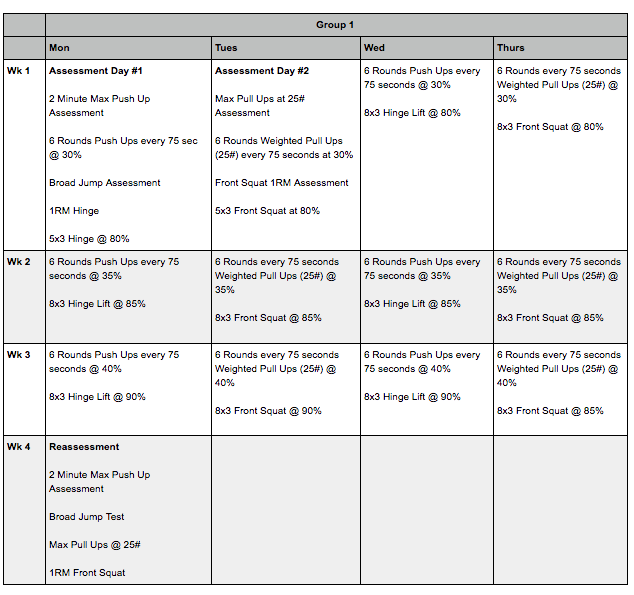
(1) Front Squat
Most efficient, effective quad strength training exercise I’ve found. The front squat also has an incredible core strength demand and is safe compared to the back squat … if the athlete fails he/she can simply “dump” the barbell forward to escape.
One issue with this exercise is many men, especially guys in their 30-40s, have wrist flexibility issues and can’t get the barbell in the “rack” position. These athletes can try our 2-Finger Front Squat Technique, or simply use the body-building crossed arms technique to hold the barbell.
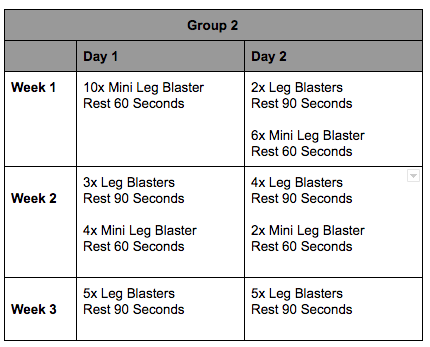
(2) Leg Blaster
I believe in the Leg Blaster’s ability to build leg strength so strongly that during the current “Geek Cycle” we’re running with our Tactical Lab Rats, we’re actually running a mini-study comparing the leg-strength building abilities of Leg Blasters to the Front Squat.
The power of this complex of bodyweight leg strength exercises is its ability to train eccentric leg strength. Leg Blasters have been a go-to exercise for years at MTI to train skiers for skiing, alpinists for downhill hiking, and soldiers with Afghanistan deployment orders for the demands of mountainous patrols.
I recall an email I received from a MARSOC Marine about 8 years who was using our Afghanistan Pre-Deployment Training Plan to train his team for an upcoming deployment. Being the high-achieving SOF guy he was, he decided not to follow the leg blaster progression in the plan and skipped ahead to the last week – and completed 5x Full Leg Blasters with a short rest between.
“I could barely walk for a week,” he wrote. Be careful with these.
(3) Back Squat
A few years ago I rarely programmed in back squats – favoring front squats instead. What changed was our experimentation and development of our Super Squat strength training progression. Super Squats deploys back squats, and we simply saw incredible strength gains from this exercise and the super squat progression.
Many coaches consider back squats a total body strength exercise and it’s hard to argue with them. There is a reason the back squat is a staple in college strength programs nation-wide. It is a classic, powerful lower body strength building exercise which hammers the quads, butt, and hips.
Lower Body Pull
(1) Walking Lunge – Loaded
The older I get and the longer I coach the more I love the simple, loaded walking lunge.
Reason #1: No learning curve. Grab a pair of dumbbells/kettlebells and start walking, tapping your own knee to the floor each rep. Step through … don’t stop in the middle.
Reason #2: Trains quads and butt/hamstrings at the same time … during the exercise athletes feel their quads. The next day they feel their butt and hamstrings. It’s the best 2-for-1 lower body exercise I’ve found.
Reason #3: Anything heavy will work. No dumbbells? … use a barbell. No gym? Use a sandbag? No sandbag? Pick up a heavy rock …. you get the idea.
After a good warm up, complete 8 rounds of 3 reps of this exercise (3x = 3x steps each leg, 6x total). Again – work up on load rapidly and aim to be at your “hard but doable” load by round 4 or 5. Your butt will not like you in the morning.
The butt/hamstring soreness is why I consider the walking lunge a lower body “pull” exercise.
(2) Hinge Lift
Our version of the dead lift. Great hamstring/butt work.
(3) Box Squat
I’m not sure why, but I’ve found the box squat really trains the hips and butt – more so than the similar back squat.
Chose a box height which gets the athlete’s thighs to parallel or slightly below, and be sure to sit on the box and unload the legs – don’t touch and go. This unloading and subsequent firing really engage the hips.
Upper Body Push
(1) Push Press
As an old (49) meathead and gym rat, it pains me to put the Push Press ahead of my beloved Bench Press in this list. Not only do I love bench pressing, but I absolutely suck at push presses.
But …. I believe the Push Press is the most functional and transferable upper body push strength exercise for mountain and tactical athletes. Transferable = what will best transfer to the type of upper body pressing these athletes will do in the “real” world.
(2) Bench Press
Whenever the young tactical lab rats in the gym consistently beat me in some lower body strength lift or work capacity event, I strategically program in bench presses for the next training session. The old lab rats in the gym, specifically James and me, love to bench with the young guys.
Nothing makes my day like crushing some young man, 20+ years younger than me by 50# in the bench press. Nothing.
THESE are my “Super Secret” bench press secrets. Do not share this link!
(3) Kettlebell Floor Press
Single-limb upper body push exercise which also has a significant core strength element. Awesome exercise. Can be completed with either dumbbells or kettlebells.
Upper Body Pull
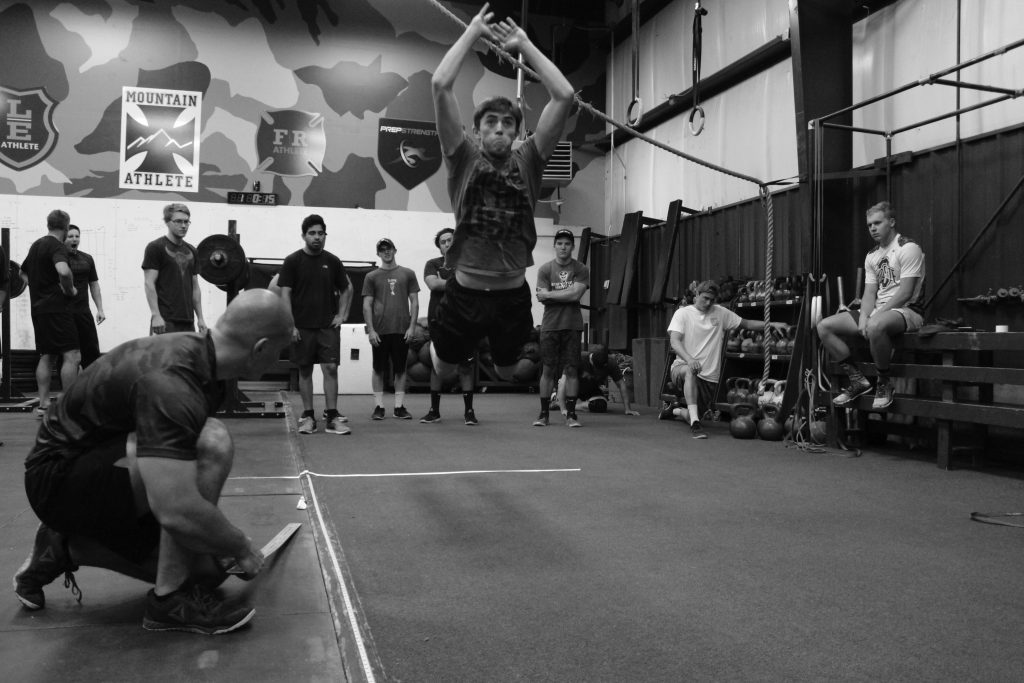
(1) Rope Climb
My original lab rat, Josh, called the rope climb the “sled push for the upper body” – and it’s my favorite pulling movement – even when using the feet. I find the rope climb more functional/transferable than the traditional pull up for mountain and tactical athletes. Plus it’s a 3-for-one exercise …. pulling strength, grip strength, mid-section strength, and when loaded (weight vest or IBA) all of the above plus leg work.
The Rope Climb is not only a great upper body pulling exercise – it is a great total body exercise. MTI’s Rope Climbing Technique
(2) Pull Up
We do ours “strict” – no kipping/bucking or chicken-necking. Full elbow extension to chin above the bar. Tactical athletes should train unloaded and with weight – 25-45 pounds.
(3) Lee Special
Another exercise I suck at, the Lee Special is a great single-limb pulling exercise with a significant midsection strength component. Great training!
Questions, Comments, Feedback? Email coach@mtntactical.com
Want More? Read MTI’s Eight Different Strength Progressions